 Constructing Triangles: Use Sketchpad's Tools

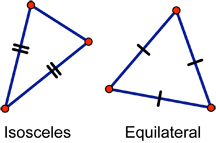
A triangle with two congruent sides is called isosceles and one with three congruent sides is called equilateral. In this tutorial, you’ll use Sketchpad’s tools to construct a triangle, an isosceles triangle, and an equilateral triangle.
Construct a Triangle 
You can construct a triangle with Sketchpad by simply drawing three connected segments. Unlike a triangle that you draw on paper, a Sketchpad triangle is “dynamic”—it can move—and can become any triangle at all, just by dragging its vertices to change its size and shape.
Open Sketchpad, or click on the Sketchpad window to make it active. Choose File | New Sketch to open a blank sketch.
Choose the Segment tool. Construct a segment using either one of two methods:
- Press and hold, drag, and release.
- Click, move, and click again.

Construct another segment attached to one endpoint of the first segment. Make sure the point is highlighted when you click.
If you make a mistake—now or at any other time—choose Edit | Undo (and if you want to redo what you undid, choose Edit | Redo).
Construct a third segment that connects the two free endpoints (check for highlighted points) to complete your triangle.
Choose the Polygon tool. Click the triangle’s vertices (points) in order. End by clicking on the point you first clicked.
Choose the Arrow tool. Click in empty space to deselect all objects.
Drag the different parts of your triangle to see how it behaves. Your triangle should stay a triangle. If not, use Edit | Undo and try again.
Construct an Isosceles Triangle 
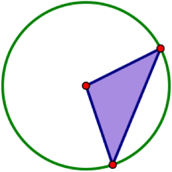
Now you’ll construct a triangle with two congruent sides. A circle holds the key to building a triangle that stays isosceles no matter how you drag it.
Choose the Compass tool. In a blank area of your sketch, construct a circle using either one of two methods:
- Press and hold, drag, and release.
- Click, move, and click again.
The circle has two points—its center and a radius point.
Choose the Arrow tool. Drag each point to see how it affects the circle.

Choose the Segment tool. Construct a segment from the center to the radius point (check for highlighted points). This is a radius of the circle.
Construct a second radius from the center to the circle. Make sure the circle is highlighted when you construct the second point.
Construct a segment between the points on the circle.
Choose the Polygon tool and construct the triangle interior.
Hide an Object 
When you construct shapes with Sketchpad, you will often need to construct objects that you don’t want to see in your finished product. For your isosceles triangle, how can you make the circle “go away”?
Choose the Arrow tool. Select the circle and choose Edit | Cut (or press Delete).
Why does your triangle also go away? The second segment you constructed was defined by the circle. Without the circle, there is no segment. And without the segment, there is no triangle.
Choose Edit | Undo to restore the circle (and triangle).
Instead, select the circle and choose choose Display | Hide Circle. This time, the circle should disappear, but the triangle should remain.
Drag the different parts of your isosceles triangle to make sure your construction stays together. If not, use Edit | Undo and try again.
Why is your triangle isosceles?
Format Your Triangles 
You can change the color and appearance of the objects that make up your triangles—points, segments, and polygons—and label them.
To select objects with Sketchpad, use the Arrow tool. When you click an object, the highlighting indicates that the object is selected. To deselect an object, click it again, or click in empty space to deselect everything.
To change a point’s size, select it and choose Display | Point Style.
To change a segment’s thickness, select it and choose Display | Line Style.
To change the color of any object—point, segment, or polygon—select it and choose Display | Color.

Choose the Text tool. Click the points to label them. Click them again to hide the labels, or double-click them to change the labels.
Choose the Marker tool. Click on one of the two congruent sides of the isosceles triangle to add a tick mark. Then add a tick mark to the other congruent side. Repeated clicking changes the number of strokes.
Construct an Equilateral Triangle 
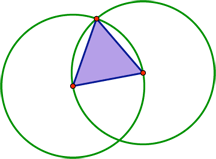
Constructing an equilateral triangle is similar to constructing an isosceles triangle, but now you’ll use two circles instead of one.
Choose the Arrow tool. Drag the first two triangles you made to make room in your sketch.
Choose the Compass tool and construct a circle.
Construct a second circle that interlocks with the first—start your new circle at the radius point of the first circle and end it at the center of the first circle. When done, there should only be two circles and two points.
Choose the Arrow tool. Drag each point. Both circles should always stay exactly the same size. If not, choose Edit | Undo and try again.
Choose the Point tool. Click on one of the intersections formed by the interlocking circles (make sure both circles are highlighted) to construct the third vertex of your triangle.

Choose the Segment tool and construct segments between the three vertices.
Choose the Polygon tool and construct the triangle interior.
Choose the Arrow tool. Drag each point of your triangle to make sure your construction holds together and stays equilateral. If not, choose Edit | Undo and try again.
Hide the circles and format your triangle. Use the Text and Marker tools to add labels and tick marks.
Why is your triangle equilateral?
Explore More
Drag the different parts of your three triangles to see how they behave. Can you make them all look as if they are equilateral? Can you make them all look as if they are right triangles? Why or why not?
Choose File | New Sketch. With the same tools you used to construct your isosceles and equilateral triangles, construct a rhombus or a regular hexagon.