 Properties of Shapes: Create and Explore Constructions
Shapes constructed in Sketchpad are dynamic because you can drag their parts to reveal their mathematical properties.
In the last tutorial, you used multiple radii of a circle to create triangles with congruent sides. In this tutorial, you’ll construct shapes that have perpendicular or parallel sides. Then you’ll look at shapes in a sample sketch and examine how they were built.
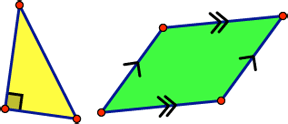
Construct a Right Triangle 
The key to constructing a right triangle is to construct a line that is perpendicular to one side of a triangle.
Open Sketchpad, or click on the Sketchpad window to make it active. Choose File | New Sketch to open a blank sketch.
Choose the Segment tool. Construct a segment using either one of two methods:
- Press and hold, drag, and release.
- Click, move, and click again.
Choose the Arrow tool. Click in empty space to deselect all objects.
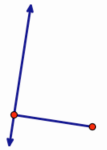
Select the segment and one endpoint and choose Construct | Perpendicular Line.
If the Perpendicular Line command is grayed out and therefore not available for use, make sure you have both a point and the segment selected.
Drag the endpoints of the segment. Notice that the new line always remains perpendicular to the segment.
Choose the Point tool. Construct a point anywhere on the perpendicular line. Make sure the line is highlighted when you click.
Choose the Arrow tool and drag the new point. It should always stay on the line. If you can drag it off the line, choose Edit | Undo and try again.
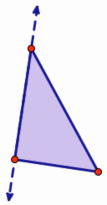
Choose the Segment tool. Construct two segments to connect the new point to each endpoint of the original segment.
Choose the Polygon tool. Click on the triangle’s vertices (points) in order, ending on the point you first clicked.
Choose the Arrow tool. Select the perpendicular line and choose Display | Hide Perpendicular Line.
Use the Drag Test
The mathematics you build into your construction gives a shape its properties, and those define its behavior as you drag its parts. In Sketchpad, you can use the drag test to answer this question: Does your construction keep the mathematical properties you intended to create, no matter how you drag it? If it does, your construction passes the drag test.
Drag the different parts of your right triangle and observe how it behaves. Does it pass the drag test?
If you can drag parts of your triangle so that it no longer has a right angle, use Edit | Undo repeatedly and try again.
Before the next construction, you’ll add a new page to your document.
Choose File | Document Options. In the dialog box, click the Add Page pop-up menu, choose Blank Page, and click OK.
Construct a Parallelogram
The key to constructing a parallelogram is to construct lines that are parallel to segments that share an endpoint. As with constructing a perpendicular line, you must select a straight object and a point to construct a parallel line.
In the rest of this tutorial, icons alone indicate when you must choose another tool. For example, before doing step 14 you must choose the Segment tool.
Construct two segments that share an endpoint. Make sure one endpoint of the first segment is highlighted when you click to construct the second segment.
Select one segment and the non-shared endpoint of the other segment and choose Construct | Parallel Line.
Drag each point to see how it affects the parallel line.
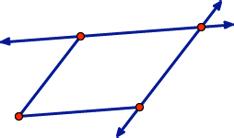
Select the other segment and non-shared endpoint and construct a second parallel line. You should see a parallelogram formed by the segments and lines. If not, choose Edit | Undo and try again.
Construct a point at the intersection of the two parallel lines. Make sure both parallel lines are highlighted when you click.
Press and hold the Polygon tool icon until a menu appears, then move to the second tool—the Polygon and Edges tool—and release.
Click the four vertices of the parallelogram in order, ending on the point you first clicked.
Select and hide both parallel lines.
Drag the different parts of your parallelogram. Does it pass the drag test? If not, use Edit | Undo repeatedly and try again.
Explore a Sample Sketch
Now you’ll look at one of the many samples sketches that you can access through Sketchpad’s Help menu. In addition to using the drag test, you’ll learn other techniques for investigating how various shapes were constructed.
Choose Help | Sample Sketches & Tools.
In the Remote Document Browser window, choose Geometry and then Properties of Shapes.
This sample sketch has three pages, each with a tab at the bottom. Navigate from page to page by clicking the tabs.
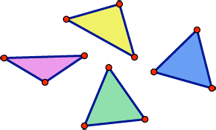
Go to page “Triangles.” Each of the four triangles has two sides that appear to be the same length, but some of these triangles are only “pretending” to be isosceles—they can be, but are not defined to be, isosceles.
Use the drag test to observe how each triangle behaves. Which ones are always isosceles?
Continue dragging parts of each triangle until you can identify each triangle by its most specific name:
- right triangle (a triangle with a 90-degree angle)
- isosceles triangle (a triangle with at least two sides of equal length)
- equilateral triangle (a triangle with three sides of equal length)
- general triangle
In the four triangles you’ve examined so far, the mathematical constraints that define each triangle are hidden. Now, you’ll use two other techniques that let you see the hidden mathematics of Sketchpad constructions.
Choose Display | Show All Hidden. You’ll see the objects that define the construction. Drag parts of each triangle to see the roles played by these other objects in the construction of each triangle.
Choose the Information tool. When you click the segments and vertices of the triangles, balloons appear that give you information about the objects and the mathematical relationships among them. Point to the links in the balloons to find and highlight objects.
Go to page “Quadrilaterals.” Only one of these four quadrilaterals is constructed to be a square. Use the drag test to determine which one has all sides congruent and all angles congruent.
Use any combination of the drag test, showing hidden objects, and the Information tool to identify each quadrilateral by its most specific name: trapezoid, parallelogram, rectangle, or square.
Explore More
Go to page “Polygons.” Of the four polygons on this page, only some are constructed to always have all sides congruent. Which ones? Use the techniques described above to identify each polygon by its most specific name.
Explore some of the other sample sketches that you can access through the Help menu.