 Rotations and Symmetry: Make a Kaleidoscope
You can see beautiful symmetric patterns when you look into a kaleidoscope. A traditional kaleidoscope uses mirrors to create reflected images, but in this tutorial, you’ll make your own “kaleidoscope” by rotating a picture and then animating the result.
Use the Picture Gallery 
You can drag or paste pictures into Sketchpad and then use them as part of your mathematical investigations.
Open a new sketch and choose Help | Picture Gallery.
Find a picture that interests you. Drag and drop the picture into your sketch—click the picture, drag it into your sketch, and release.
Another method is to right-click (or Control-click) the picture and choose Copy Image in the pop-up menu. Then click your sketch to make it active and choose Edit | Paste Picture.
Experiment with resizing your picture by dragging the corners. Also try dragging the corners as you hold the Shift key.
Construct Points on Paths 
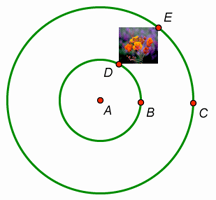
To build a kaleidoscope, you’ll first construct two concentric circles, with a moveable point on each one.
Construct a circle. Then construct a second, larger circle with the same center by first clicking the existing center (the point will be highlighted).
Construct a point on each circle. Make sure the circle is highlighted when you click.
Use the drag test to verify that your new points stay on the circles. If not, use Edit | Undo and try again.
The new points are defined to be on the circles, which means that each circle defines the path its point can move along.
Label the center A, the two radius points B and C, and the two points on the circles D and E. You can double-click a label to change it.
Attach and Rotate a Picture 
Now you’ll add the picture to your kaleidoscope so that opposite corners of the picture are attached to the points on the circles. Then you’ll rotate your picture several times to make multiple copies of the picture.

Click in empty space to deselect everything. Then select your picture and choose Edit | Copy.
Click in empty space to deselect everything. Then select points D and E and choose Edit | Paste Picture. Opposite corners of the picture are now attached to the two points.
Drag each point one at a time to explore the effect it has on your model.
Select point A and choose Transform | Mark Center.
Select the picture attached to the points and choose Transform | Rotate. In the dialog box, enter 60 for the angle, and then click Rotate.
If you kept rotating by 60°, how many pictures would the kaleidoscope contain before the pictures overlap?
With the new picture still selected, rotate it by 60° as well. Rotate each new image by 60° until you have six pictures.
Animate Your Kaleidoscope 
Now that your kaleidoscope is complete, it’s time to set it in motion! Sketchpad allows you to animate your constructions, maintaining all of the mathematical relationships that you built into your model.
Click in empty space to deselect everything. Select points D and E and choose Display | Animate Points.

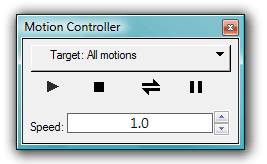
On the Motion Controller, click the arrow buttons to change the speed of your kaleidoscope and press Pause (![]() ) to temporarily stop motion. (If you press Stop and drag parts of your model, points D and E will no longer be active targets and will need to be selected again.)
) to temporarily stop motion. (If you press Stop and drag parts of your model, points D and E will no longer be active targets and will need to be selected again.)
Change the look of your kaleidoscope by dragging any of the points in your model. Press Pause again to set the kaleidoscope back in motion.
Press Pause to stop the motion. Select all the circles and points and choose Display | Hide Objects. (To see the hidden objects again at any time, choose Display | Show All Hidden.)
Open the Picture Gallery again and find another picture that interests you. Drag and drop (or copy and paste) the picture into a blank area of your sketch.
Select the new picture and choose Edit | Copy.
Select one of the original pictures in your kaleidoscope and choose Edit | Paste Replacement Picture. Every picture is replaced.
Press Pause to set your new kaleidoscope back in motion.
Explain how your kaleidoscope works. How do the speeds of the moving points compare? Why do the pictures become distorted?
Press Stop and close the Motion Controller.
You can make a button that will automatically animate your kaleidoscope, but first you need to unhide the points that drive the animation.
Choose Display | Show All Hidden. Click only on points D and E to deselect them, and then choose Display | Hide Objects.
Select points D and E, choose Edit | Action Buttons | Animation, and click OK in the dialog box that appears. An Animation button is created. Press the button set the kaleidoscope in motion. Press the button again to stop the animation.
Explore More
Make a new kaleidoscope starting from scratch. This time, rotate your picture by either 30° or 45°. What other angles could you use?
If you have your own digital photograph or image available, drag or paste it into your sketch. Use this picture in your kaleidoscope.