 Constructing Squares: Create a Custom Tool
In this tutorial, you’ll learn how to construct a square using two very different methods. Each construction will guarantee that your quadrilateral has four right angles and four congruent sides—no matter how you drag it. Then you’ll teach Sketchpad your construction steps and save them as a “custom” tool. Your custom square tool will allow you to construct new squares easily and quickly whenever you need them.
Construct a Square Using a Compass and Straightedge 
There are many ways to build a square with Sketchpad. One common method uses Sketchpad’s Compass tool as part of the construction. You may be surprised that a circle can help you build a square.
Open a new sketch and construct a segment. The endpoints of the segment are the first two vertices of your square.
Label the endpoints of the segment A and B.
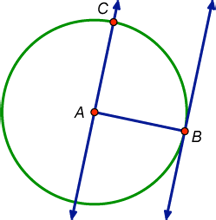
Now you’ll construct two lines perpendicular to AB, one passing through point A and one through point B.
Select point A and AB. Choose Construct | Perpendicular Line. You should end up with a line through point A perpendicular to AB.
Construct a line through point B that is perpendicular to AB.
Apply the drag test—drag each endpoint and make sure the lines stay perpendicular to the segment.
Construct a circle centered at point A with radius point at point B.
Your sketch should still contain just two points, A and B. If you’ve created a third point, choose Edit | Undo and try again.

Construct a point at the intersection of the circle and the perpendicular line through point A (both the circle and the line will be highlighted). This is the third vertex of your square. Label it C.
Select point C and AB. Choose Construct | Parallel Line.
Construct a point at the new intersection formed by two lines. Label this point D. This is the last vertex of your square.
Select the three lines and the circle and then choose Edit | Action Buttons | Hide/Show. A Hide/Show action button is created. Press the button to hide the objects. Press it again to show the hidden objects.
Connect the vertices with segments.
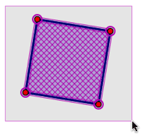
Construct the square’s interior—click in order points A, B, D, C and point A again to finish.
Apply the drag test to your square. Drag the four vertices, one by one, and observe how the square behaves. Can you explain why this quadrilateral is always a square? What was the purpose of using the Compass tool?
Create a Custom Square Tool 
Now that you have made a square, you can save your hard work and make more squares without having to start from scratch every time. Sketchpad’s Custom tools feature allows you to teach Sketchpad how to make a square (or any other construction you might build).

Press Hide Path Objects if your circle and lines are visible. Then select only the four vertices of your square and choose Display | Hide Labels.
Draw a selection rectangle around the entire square to select it (vertices, sides, and interior).
Press and hold the Custom tools icon and choose Create New Tool from the menu that appears. Name the tool Square and click OK.
Press the Custom tools icon to select your new tool. Move the pointer to your sketch window and press, drag, and release (or click and click) to make a square. Use your square tool to make several squares. Try linking squares by building squares on vertices of other squares.
Sketchpad lists every step of your square construction as easily readable instructions so that you can remind yourself of how the square was built.
Press the Custom tools icon and choose Show Script View. You’ll see that your square tool requires two “givens”—points A and B. Construct two points in your sketch and select them both. These are your givens. Then keep pressing the Next Step button in the Script View window to watch your Sketchpad custom tool build a square one step at a time.
Construct a Square Using Rotations 
Another way to construct a square from scratch is to use Sketchpad’s Rotate command.
Choose File | Document Options. In the dialog box, click Add Page and choose Blank Page from the pop-up menu. Give the page a name and click OK.
Construct a segment. The endpoints of the segment are the first two vertices of your square. Label the endpoints of the segment A and B.
Now you’ll rotate AB by 90° to create a second side of your square. To perform a rotation, you need to tell Sketchpad two pieces of information—the center of rotation and what object is being rotated.
Click in empty space to deselect all objects. Double-click point A (or select it and choose Transform | Mark Center). A brief animation appears.

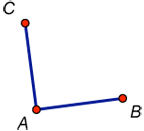
Select point B and the segment. Choose Transform | Rotate. In the dialog box, enter an angle of 90° about the center A and click Rotate.
Label the third vertex of the square C.
You now have two adjacent sides of your square. Use the Rotate command again to construct another side and the fourth vertex of your square. Remember to mark a center for your rotation and choose only one point and one segment to rotate.
Construct the last side between two vertices to complete your square. Label the last vertex D.
Construct the square’s interior.
Drag the different parts of your construction, making sure the quadrilateral stays a square as you drag it.
Turn your new square construction into a custom tool, as you did in steps 14–17. Name your tool Square (Rotation).
Press and hold the Custom tools icon and choose Tool Options. A list of your two tools appears. Choose your first tool, rename it Square (Compass), and click OK.
Add a blank page to your sketch. Construct two squares using each custom square tool once.
Drag each vertex of the squares, one by one. For some vertices, the size of the square will change when you drag them. For the other vertices, the square will stay the same size when you drag them. Can you explain the reason for this behavior?
The mathematical properties used to build each square define and constrain its behavior. Use the Information tool to remind yourself how the squares were built and try to explain why the squares behave differently depending on the vertex you drag.
Now that you have two square tools, you can save them for future use (specifically for Tutorial 9—Pythagorean Theorem). Choose File | Save and give your Sketchpad document a name.
Explore More
Find another method to construct a square. If you’re having difficulty, think about the symmetry in a square. Then create another custom tool.
Create custom tools for other types of quadrilaterals, such as a rectangle, rhombus, kite, or trapezoid.