 Twist and Shrink: Rotate and Dilate a Picture
In this tutorial, you’ll rotate a picture by a marked angle and dilate a picture by a marked scale factor. Then you’ll combine both transformations into a single two-step transformation that rotates a picture and dilates the result. By repeating this process, you’ll create a dramatic result.
Rotate a Picture 
You’ll begin by picking a picture, measuring an angle, and rotating the picture.
In a new sketch, choose Help | Picture Gallery.
Find a picture that interests you and drag it into your sketch (or copy and paste it into your sketch).
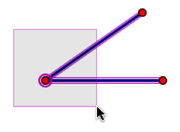
Construct two segments that share a common endpoint.
Click, drag, and release to form a selection rectangle around the vertex of the angle. Choose Measure | Angle. The points are automatically labeled.
Select point B (the vertex) and choose Transform | Mark Center.
Select your picture and choose Transform | Rotate. With the dialog box open, click the angle measurement in the sketch. Then click Rotate.
Drag points A and C. What type of motion makes the rotated picture move? What type of motion keeps it nearly steady? Why?
How many degrees do you need to rotate the picture to turn it upside down?
Dilate a Picture
To dilate your picture, you’ll measure the position of a point along a segment and mark it as a scale factor.
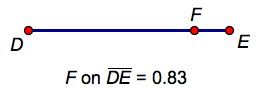
Construct a segment.
Construct a point on the segment.
Select the point on the segment and choose Measure | Value of Point. (The points are automatically labeled.) Drag point F back and forth.
The Value of Point command measures the position of point F along a segment where the endpoints are defined as 0 and 1.
Click in empty space to deselect all objects. Select the measurement F on DE and choose Transform | Mark Scale Factor.
Select your original picture and choose Transform | Dilate. In the dialog box, click Dilate.
Drag point F along the segment. What effect does moving point F have on the dilated image? What happens as point F approaches either endpoint?
Define a Custom Transformation
Now you’ll combine the rotation and the dilation into a single transformation that will allow you to both rotate the picture and dilate the rotated image.
Delete all pictures except the original picture.
Construct a point and label it G.
Select point G, choose Transform | Rotate, and then click Rotate. Label the rotated point G′.
Select point G′, choose Transform | Dilate, and then click Dilate. Label the dilated point G′′.
Select points G and G′′ and choose Transform | Define Custom Transform. Name your transformation Twist and Shrink and click OK.
Select points G,G′, and G′′ and choose Display | Hide Points.
Select the picture and choose Transform | Twist and Shrink. With the newest picture selected, choose Transform | Twist and Shrink again. If you keep repeating this transformation, what do you predict the result will look like?
Apply Transform | Twist and Shrink again and again to create at least 30 transformed pictures. Use the keyboard shortcut for this transformation (displayed in the Transform menu) to speed the process.
Drag points in your sketch to change the angle and scale factor of your custom transformation. Look for combinations of angles and scale factors that make interesting spirals.
Drag point A to make ![]() ABC smaller and smaller. Explain why the transformed pictures wind their way towards point B.
ABC smaller and smaller. Explain why the transformed pictures wind their way towards point B.
What combinations of angles and scale factors make straight lines of images appear to come out from point B? Can you explain why?
Explore More
Open the Picture Gallery, find a new picture, and copy it. Then select any picture in your spiral and choose Edit | Paste Replacement Picture to create a new spiral.
If you use a point on a ray instead of a point on a segment, the value of the point can be any positive number. If you use a point on a line, the value of the point can be any positive or negative number. Change your model so that a point on a line determines the scale factor. What happens when the scale factor is greater than 1 or less than 0?