 Pythagorean Theorem: Iterate a Construction
In this tutorial, you’ll construct a right triangle and use a custom square tool to investigate squares on the sides of the right triangle.
Set Up Your Tool Folder 
Sketchpad allows you to designate a Tool Folder—a repository of Sketchpad documents with custom tools—that is always available to you.
In a new sketch, press and hold the Custom tools icon. If Example Tools appears in the menu, you or someone else has already designated a Tool Folder and you don’t have to do anything else.
If Example Tools does not appear in the menu, choose Choose Tool Folder from the menu and designate a folder (or add a new one using New Folder) as your Tool Folder. Make sure that Create Example Tools document in chosen Tool Folder is checked and click Choose.
Press and hold the Custom tools icon. Without releasing, move the cursor to Example Tools in the Tool Folder section of the menu. You will see the eight custom tools that come with Sketchpad. You will use the Square Given Two Vertices tool in this tutorial.
If you’ve completed Tutorial 8—Square Constructions, you can now save that sketch into your Tool Folder and have easy access to your own custom square tools!
Now you’ll construct a right triangle as you did in Tutorial 2—Properties of Shapes.
Construct a segment.
Select the segment and one endpoint and choose Construct | Perpendicular Line.
Construct a point on the perpendicular line.
Select only the line and choose Display | Hide Perpendicular Line.
Connect the three vertices.
Apply the drag test—drag the different parts of your triangle and make sure it behaves like a right triangle.
Use Your Square Tool
Now you’ll construct squares on each side of your right triangle and investigate their areas.
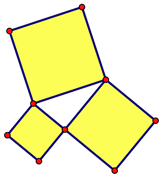
Press and hold the Custom tools icon and choose a Square tool. Click one vertex of the right triangle and then another. A square appears.
If the square appears inside the right triangle, choose Edit | Undo and then click the two vertices in the opposite order.
Construct squares on the other two sides of the right triangle. All three squares should sit on the outside of the triangle.
Click in empty space to deselect all objects. Select the three square interiors and choose Measure | Areas.
Now you’ll find the sum of the areas of the two smaller squares.
Choose Number | Calculate to open Sketchpad’s Calculator.
Click one of the two smaller area measurements in the sketch to enter it into the Calculator. Then click the + key, click the other smaller area measurement in the sketch, and click OK.
Drag the vertices of your right triangle. How does the sum of the areas of the two smaller squares compare to the area of the larger square?
This property is called the Pythagorean theorem. Use a caption with Hot Text to state this theorem using proper mathematical vocabulary.
Construct a Pythagorean Tree
To iterate an action is to repeat it some number of times. In geometry, an iteration uses an operation performed on one set of geometric objects to produce a new set of objects that share the same relationship. You’ve just constructed squares on the three sides of a right triangle. You’re now going to iterate this right-triangle construction to produce a tree-like construction whose branches contain smaller and smaller copies of your triangle and three squares.
Choose File | Document Options and add a blank page to your document.
Use a custom tool to construct a square ABCD that’s controlled by the two bottom points A and B (dragging either point changes the size of the square). Label the vertices.

Select CD and choose Construct | Midpoint. Label the midpoint E.
Select in order points E and C and choose Construct | Circle by Center+Point.
Select in order point C, point D, and the circle. Choose Construct | Arc on Circle.
Select the circle (not the arc) and choose Display | Hide Circle.
Construct a point F anywhere on the arc.
Construct sides CF and DF. Why is ΔDFC a right triangle?
Select the arc and point E and hide them.
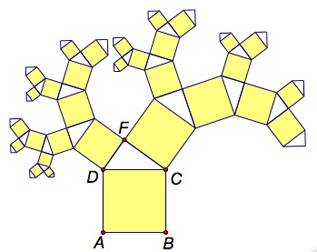
Select points A and B and choose Transform | Iterate. Click, in order, on points D and F to map points A and B to points D and F. In the Structure pop-up menu, choose Add New Map and map points A and B to points F and C. Click Iterate.
You should now have squares and right triangles growing off the legs of your original right triangle. Drag point F to wave the tree’s branches.
Add branches to the tree by selecting any part of the iterated image and pressing + on your keyboard. Press – to remove branches.
Explore More
Construct a general triangle and use your custom Square tool to construct squares on all three sides of the triangle. Find the areas of three squares. Compute the sum of two of the areas, and then drag the vertices. What does the triangle look like when the sum is greater than the third area? What does it look like when the sum is less than the third area? How could you use an angle measurement to confirm your observations?