 Sine Wave Tracer: Animate and Trace Points
In this tutorial, you’ll construct an animation that traces out a special curve called a sine wave.
Construct a Model 
You’ll start by constructing a point that moves along a circle and a point that moves along a segment.
In a new sketch, construct a segment. Hold down the Shift key as you draw the segment to keep it horizontal.
Label the endpoints A and B.
Construct a circle centered at point A with a radius point not on AB. Label this point C.
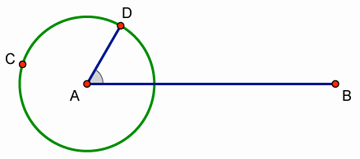
Construct a point on the circle. Label it point D.
Construct AD.
Click point A with the Marker tool, drag into ![]() BAD, and release to create an angle marker in
BAD, and release to create an angle marker in ![]() BAD.
BAD.
Drag point D around the circle and watch the angle marker. What do you notice? By default, the angle marker is defined to be a simple angle of less than 180°.
Select the angle marker and choose Edit | Properties. On the Marker panel, choose Counter-clockwise as the angle definition and click OK.
Drag point D around the circle again. What do you notice now?
Construct a point on AB that is not on the circle. Label it point E.
Select point E and AB and choose Construct | Perpendicular Line.
Select point D and AB and choose Construct | Parallel Line.
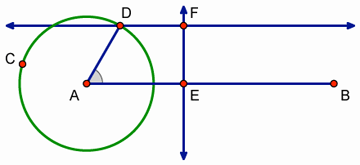
Construct a point at the intersection of the horizontal line through point D and the vertical line through point E. Label it point F.
Drag point D around the circle and watch what happens to point F. How does dragging point D change the horizontal and vertical position of point F?
Now drag point E and watch point F. How does dragging point E change the horizontal and vertical position of point F?
Make an Animation Button
Now you’ll create a button that makes points D and E move at the same time.
Select in order points E and D and choose Edit | Action Buttons | Animation.
In the dialog box, check that point E is highlighted in the Animate list. If not, click the row describing point E to highlight it.
In the Direction pop-up menu, choose forward. Then click OK.
Press the Animate Points button. Describe the path traveled by point F.
Press the button again to stop the animation. Press the button on and off a few more times.
Trace a Point
By tracing point F, you will form a sine wave curve.
Select point F and choose Display | Trace Intersection.
Press the button to start the animation again. How do the motions of points D and E result in the path traced by point F?
Stop the animation and choose Display | Erase Traces.
Adjust the length of AB until you can make the path traveled by point F trace back on itself instead of drawing a new curve every time. Press Shift as you drag point B to keep AB horizontal.
Start and stop the animation, and erase your traces as necessary. (If you have difficulty, try measuring the circumference of the circle and the length of AB and work with these lengths.)
After you’ve finished adjusting AB, erase all traces and then trace the path of point F one last time. This curve is a called a sine wave. The trace of point F graphs the height of point D on the circle as point E travels in time.
Use a Trigonometric Axis
Now you’ll explore the connection between the trace of point F and the algebraic equation of a sine curve.
Stop all motion, erase all traces, and deselect all objects. Then select the circle and choose Graph | Define Unit Circle.
Choose Graph | Plot Points. Plot point (2π, 0). To enter π from your keyboard, simply type “P.” Then click Plot and Done.
Choose Graph | Grid Form | Trigonometric Axis, and then click Yes to switch angle units from degrees to radians.
Select Point B and the point at (2π, 0) and choose Edit | Merge Points.
Drag point D to (1, 0) and point E to the origin of the coordinate system. Erase all traces and then press your animation button.
Where does your sine wave reach its maximum and minimum? Where is it zero?
Choose Graph | Plot New Function. In the Calculator, type “sin” and insert an x between the parentheses that appear. Then click OK.
Now you can see your traced sine wave as one period in the complete sine function.
Select ![]() BAD’s angle marker and choose Measure | Angle. Start and stop the animation and observe the relationship between the measure of
BAD’s angle marker and choose Measure | Angle. Start and stop the animation and observe the relationship between the measure of ![]() BAD and the location of point E along the x-axis.
BAD and the location of point E along the x-axis.
Explore More
You can improve your sine wave model with Movement buttons to move points D and E to their starting positions at (1, 0) and (0, 0). For example, to move point D to (1, 0), first construct or plot a point at (1, 0). Then select in order point D and the point at (1, 0) and choose Edit | Action Buttons | Movement.
Can you find a way to trace the cosine function?