
 |
Algebra with SketchpadSketchpad is an excellent tool for exploring and understanding algebra. You’ll find many tools and techniques that relate directly to your algebra curriculum: expressions and variables, plotting points and graphing equations, functions and families of functions, and so on. In one sense, Sketchpad is a powerful graphing calculator. But at a deeper level, you’ll find that both the "dynamic" and the "geometry" halves of "Dynamic Geometry" offer valuable and distinct contributions to your students’ deep understanding of algebraic concepts. Dynamism gives students the ability to vary mathematical quantities directly, and thus captures the ideas of variables and variation central to algebraic understanding. And geometry—the visualization of mathematical structure—grounds many of our algebraic ideas of graphing and plotting. Much of contemporary algebra curriculum has its roots in 17th and 18th century analytic geometry, and Sketchpad can make that historical connection apparent and relevant to present-day students. The Slope and Equation of a Line
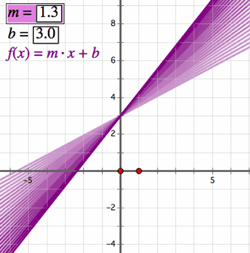
Next, select the line and choose Measure | Equation. Now students make connections between the graph of the equation and the values of both the slope and y-intercept. Ask them to drag the line in a way that keeps the y-intercept the same; this kind of interaction helps develop visual meanings for each of the constants in a linear equation. You’ll notice that everything “below the line” in the Measure menu is there to do algebra: in addition to slope, equation, and coordinates, the Coordinate Distance command measures distances in coordinate units—rather than physical units like centimeters or inches that accompany geometric distances. Next, students can use the Number and Graph menus to produce their own functions and graphs. In addition to working simultaneously with graphical and symbolic representations, they can also produce tabular representations. Plot a quadratic function, place a point on the function, and measure its x- and y-coordinates. Select these two measurements and choose Number | Tabulate. Move the point along the function plot and add new table data, repeating the process until the numerical relationship between the coordinates can be discerned. In these examples, Sketchpad allows you to use measurements to turn shapes into number (slopes, coordinates) and symbols (equations). Variables and ExpressionsEven before delving into functions and equations, algebraic thinking begins with the idea of a variable. In Sketchpad, the idea of a variable can be introduced using a parameter (in the Number menu), which is a named, changeable value. For example, create a new parameter x = 2, and then calculate 5 • x (that is, 10). Now change the parameter from 2 to 3. Have students describe the dependent relationship of 5 • x to the “varying” value. As an extension, select the parameter and calculation and choose Graph | Plot as (x, y) to plot the point (x, 5 • x). Then have students animate the parameter (turning it into a variable) and describe how that point moves as x varies. Students can tabulate these values (x and 5x) and keep track of the values as they change—variation at work again. So, Sketchpad allows you to begin with numbers and symbols (parameters, table data) and turn them into shapes (line plots). Parameters and DynagraphsPutting these capabilities together—graphing functions and parametric variation—leads to powerful algebraic lessons and ideas. For example, use the parameter to help students understand the effect of coefficients in algebraic equations. Ask students to plot a new function y = (x – h)(x – k), where h and k are parameters. When h = k = 1, students will see a parabola whose vertex is (1, 0). By changing the values of the parameters, students see what happens to the parabola as those values increase, become negative, or even zero. By animating or dragging to adjust the parameters, students can also appreciate the continuous change that results. So, instead of seeing a discrete, unconnected set of function plots, they see a continuous whole—all the parabolas of the form y = (x – h)(x – k). This parameter variation is at the heart of the dynamism of Sketchpad. The importance of the dependence relationship between the dependent and independent variables in an equation can become very clear to students by using Sketchpad’s dynagraphs, in which the x- and y-axes are positioned in parallel, so that moving x along the x-axis produces a dynamic change in f(x) along the y-axis. Dynagraphs have been shown to not only help students appreciate functional dependence, but also to draw their attention to domain and range, as well as the actual behavior of functions. For example, the distinction between the growth of linear and quadratic functions is striking as students drag x along the x-axis and watch f(x) move. This appreciation of the behavior of functions is a valuable foundation for modeling and application contexts.  Functional Relationships: Connecting Geometry and Algebra
If the radius was selected as the x-coordinate, students will see that the relationship of radius to area is a quadratic function. The tracing of the function provides students with a process-oriented sense of the relation between radius and area. To conceive of that relationship as a function, students will benefit from moving from a process view to an object one. This transition can be assisted by using Sketchpad’s Locus command. Select the radius point and plotted point and choose Construct | Locus. This will create a graph that contains all the traced points. Sometimes you’ll find that taking a common algebraic activity, such as plotting a quadratic function, and exploring in depth—realizing that quadratic functions can represent the plots of all possible radius and area combinations for all possible circles—is the most powerful way to cement the meaning of a functional relationship. |
 One of the first topics of algebra is the study of linear equations and graphs. Sketchpad’s Straightedge tool might strike you first as a geometric object, but with the help of the Measure menu, students can quickly start working with algebraic ideas such as slope, linear equations, and intercepts. Draw a line, select it, and choose Measure | Slope. Sketchpad will add a coordinate system and give the slope of the line. Tilt the line (drag one of its defining points) to see how the value of the slope changes dynamically. Drag the whole line, and the slope doesn’t change at all! Students can work with slope visually, gaining fluency with the values associated with flat, slightly inclined, and steep slopes.
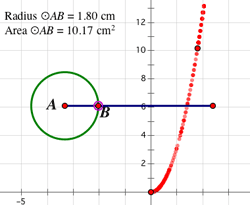 Students can explore and interact with simple geometric models to develop their understanding of functional dependency and relationships. For example, construct a horizontal segment, then a circle centered at its left endpoint, with radius point anywhere on the segment. Drag the radius point along the segment in order to increase and decrease the size of the circle. Invite students to identify relationships between different parts of the circle as the radius point moves. Students might propose a relationship between the radius and area of the circle. Use the Measure menu to measure the radius and area, then select the measurements and choose Graph | Plot as (x, y). As you move the radius point along the segment, the plotted point will move too. Trace the plotted point to get a better picture of the graph.